baking

Enchanted Toadstool Biscuits

Ingredients:

For the gingerbread tops:

  • 125g butter

  • 250g plain flour

  • 100g dark Muscovado sugar

  • 1tsp Bicarbonate of Soda

  • 4 tbsp Ground Ginger

  • 4tbsp Golden Syrup

For the stalks - one batch of Zimtsterne biscuit dough (see previous blog post) You’ll also need a small paintbrush.

For icing the spots on the caps:

1 small egg white

100g icing sugar

squeeze of lemon

cocktail stick

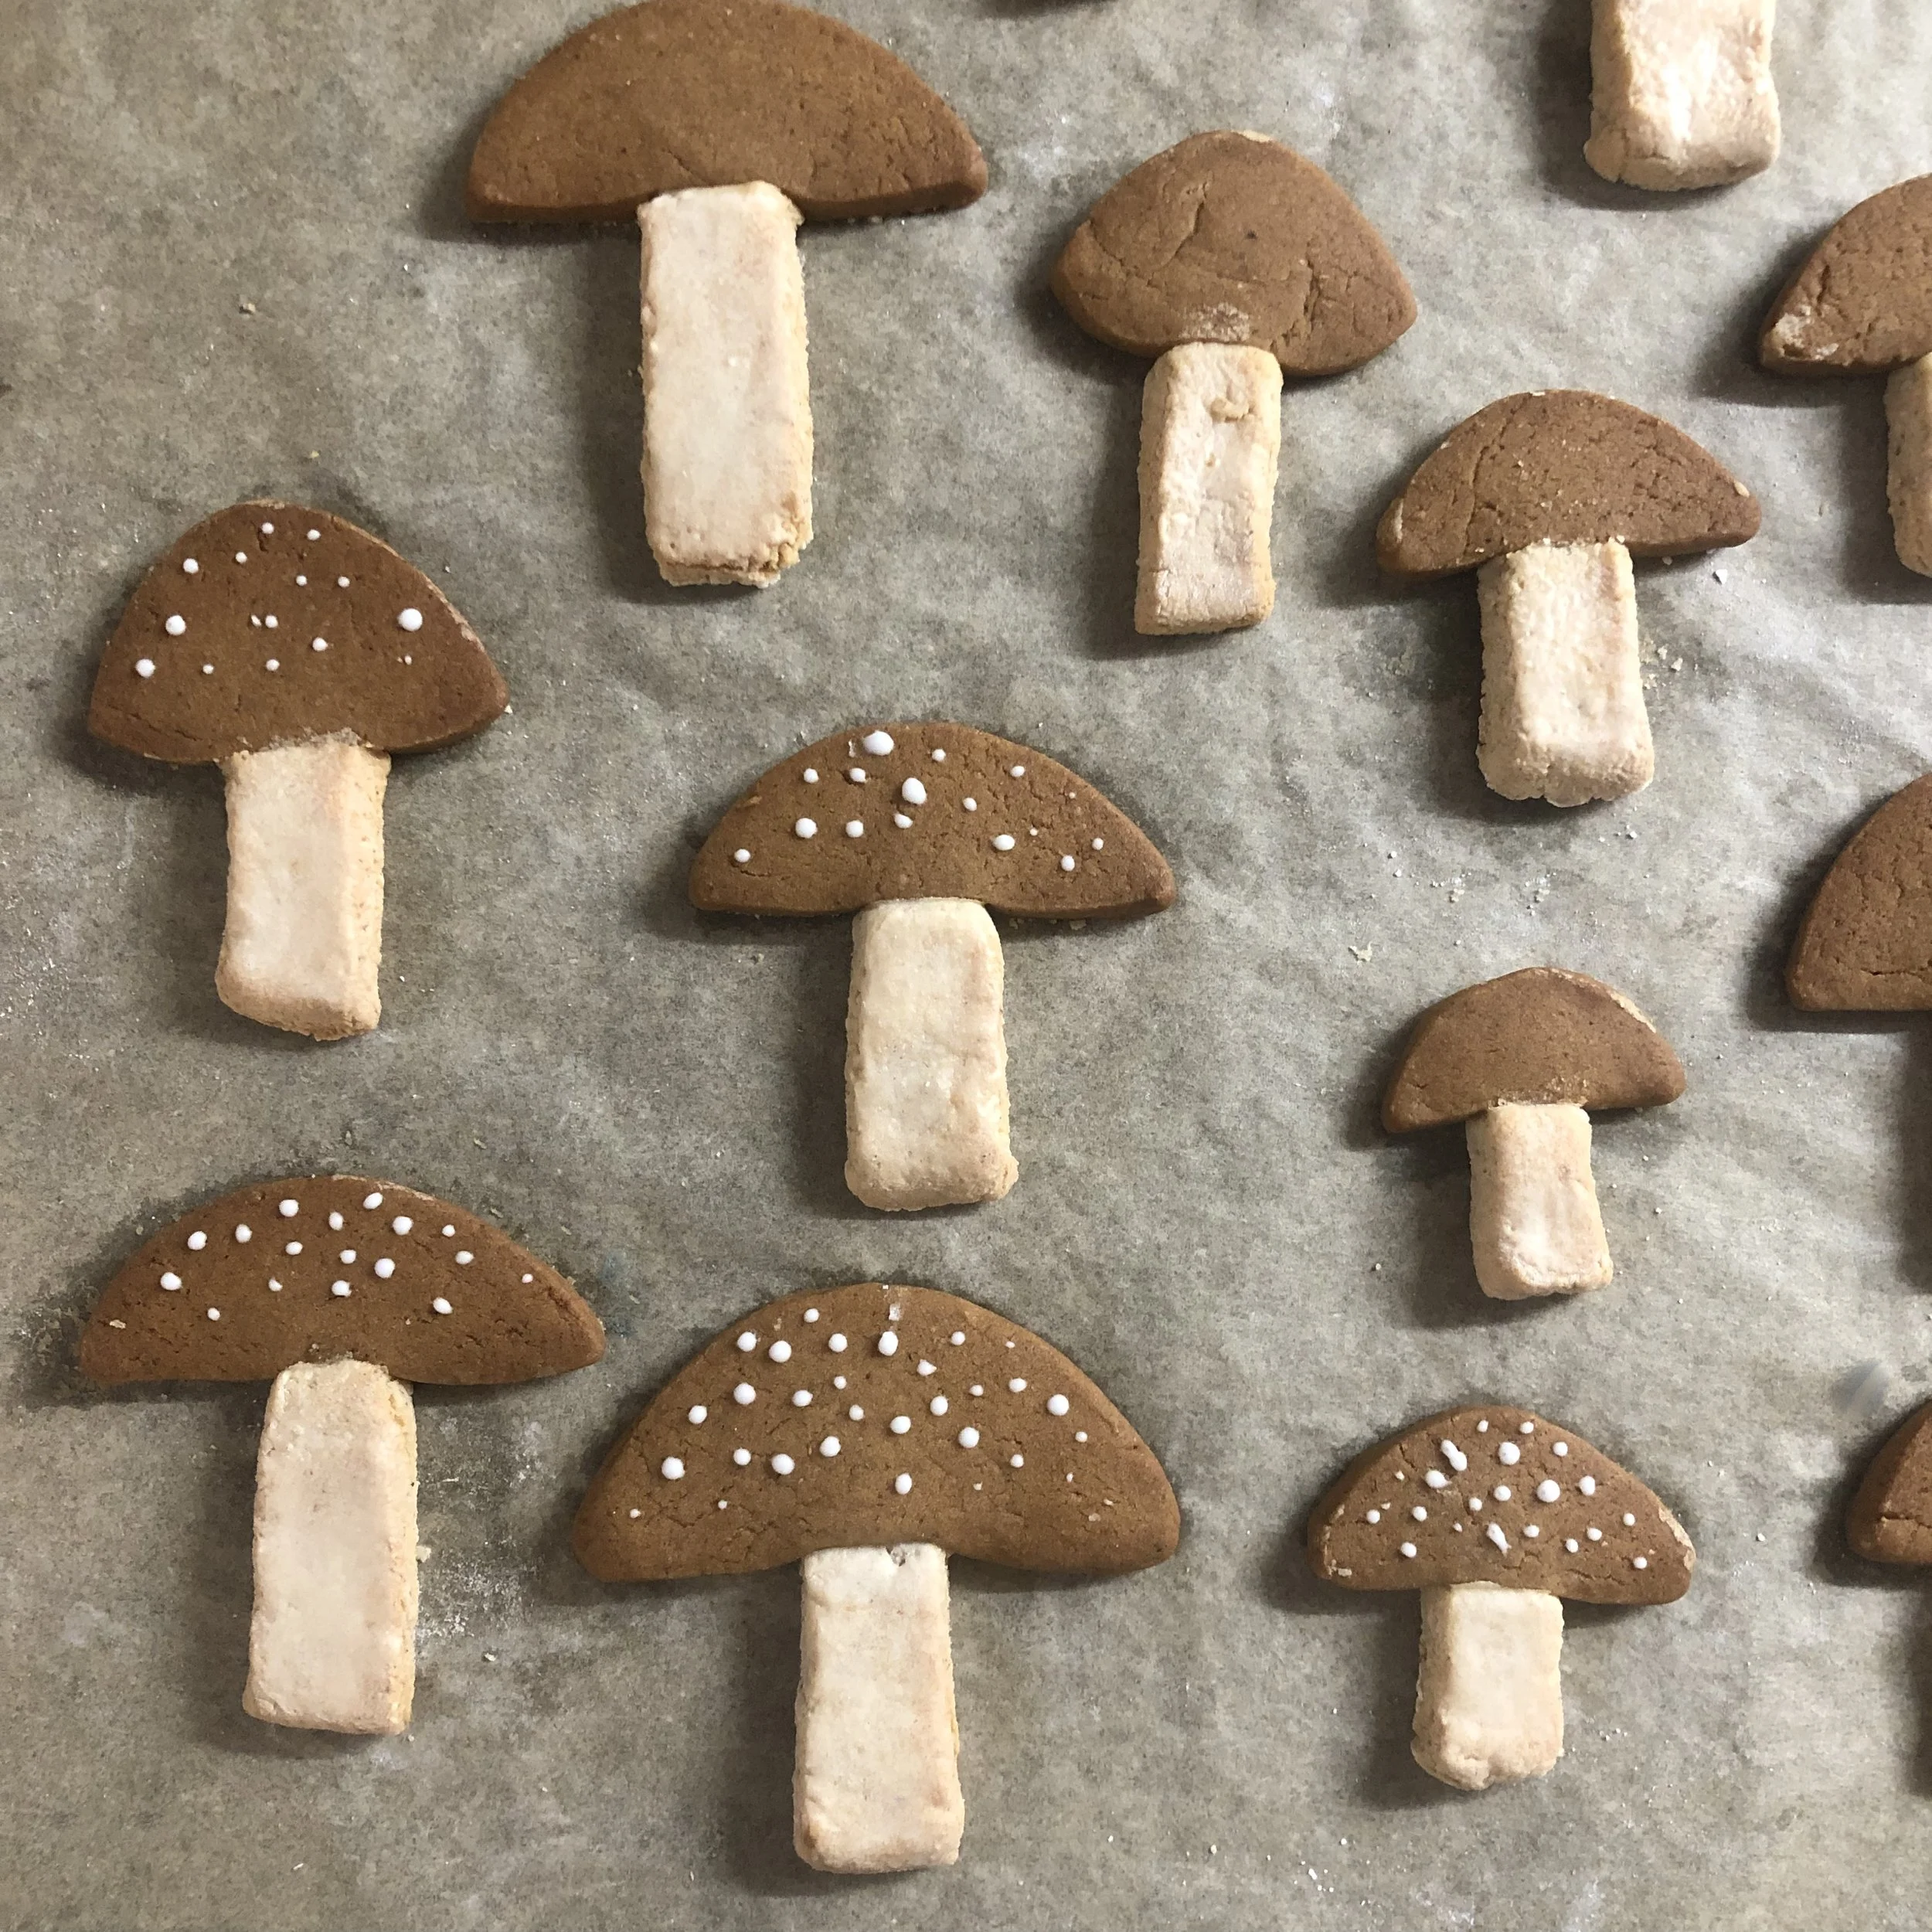
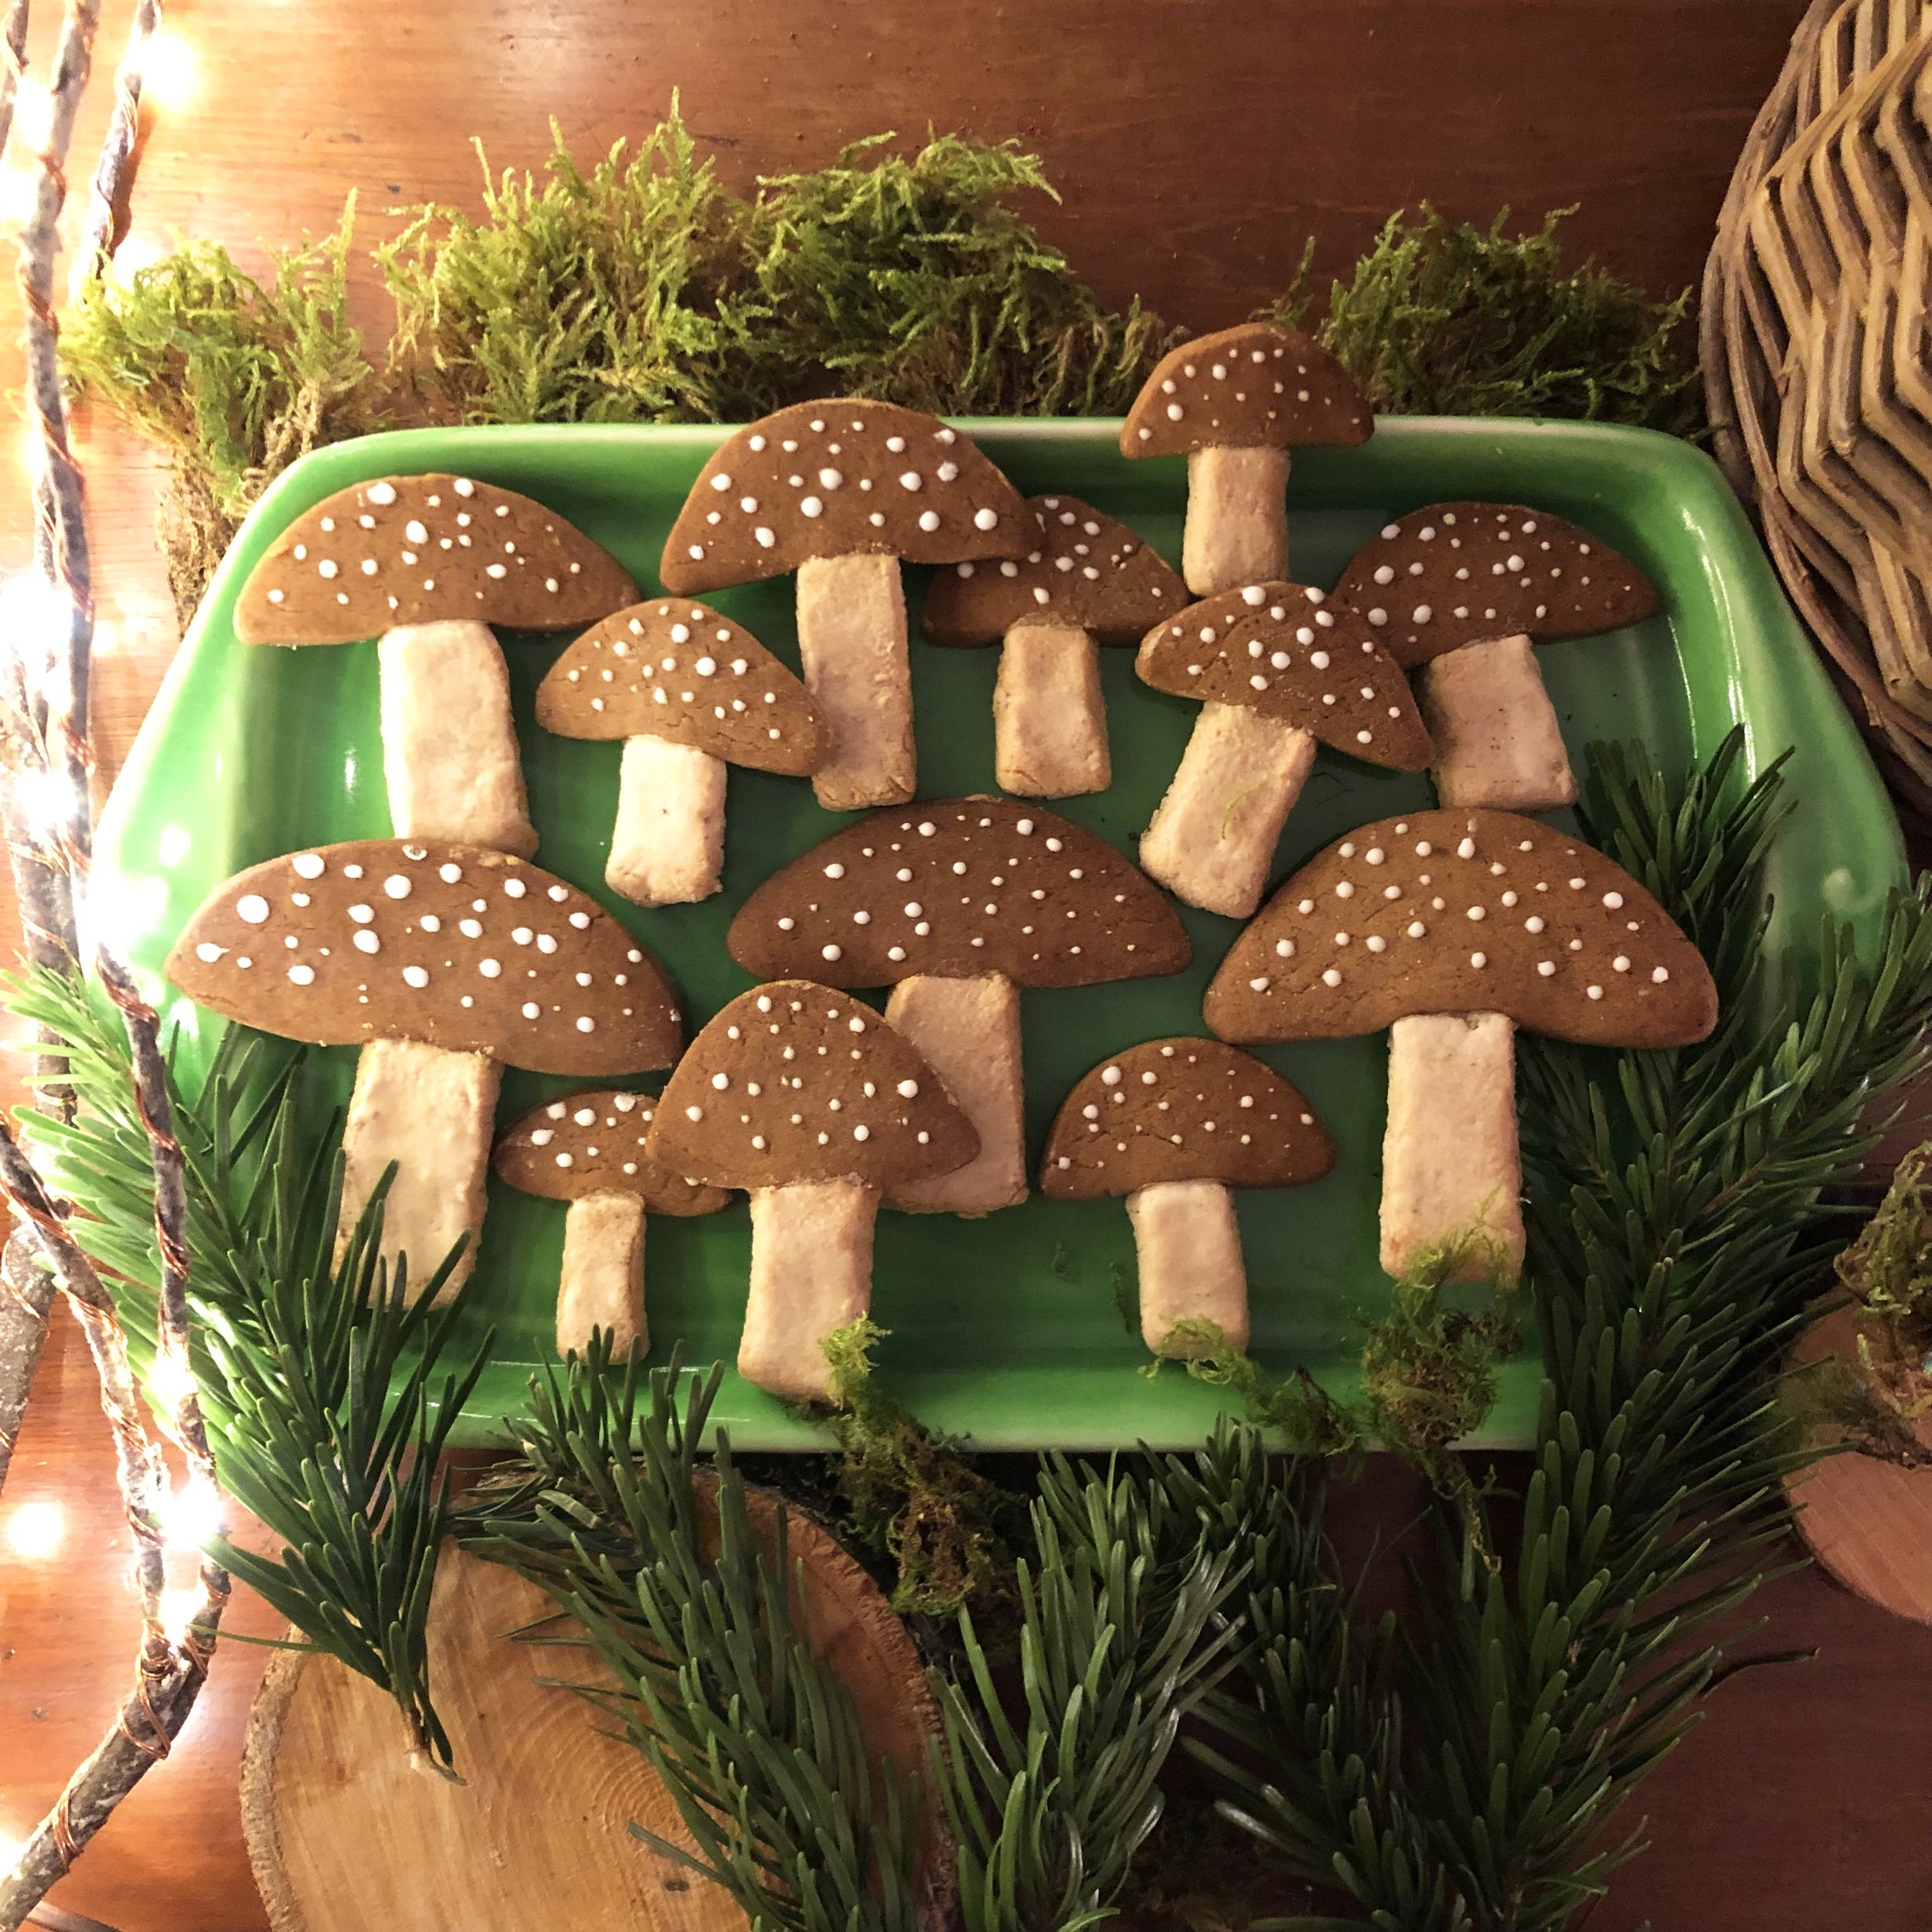
These fairytale toadstool biscuits are made from two different batches of dough. The tops are made from gingerbread, and the stalks from Zimtsterne dough.

Pre-heat the oven to 160˚/ gas mark 3 and line a baking tray with baking paper.

For the Gingerbread:

In a saucepan gently melt together 125g of butter, 4 tbsp of golden syrup and 100g of dark muscovado sugar. Stir well until the sugar has dissolved.

In a bowl sift together 250g of plain flour, 4 tsp of ground ginger and 1 tsp of bicarbonate of soda. Pour the melted ingredients into the bowl of dry ingredients and mix until a soft dough is formed.

Wrap up the dough in cling film or baking paper and chill it in the fridge for 10 - 15 minutes.

Now make your Zimtsterne dough by following the recipe on the previous post. Remember to reserve some of the meringue for painting the stalks before baking.

Roll out the gingerbread dough to a thickness of 0.5cm onto a floured surface and cut out toadstool-cap shapes using a knife. Place them onto the tray lined with baking paper.

Now roll out the Zimsterne dough and cut stalk shapes. Using a clean paintbrush, paint a thin layer of the reserved meringue onto the front of the stalks. Dab a little more onto the top of the stalk where it joins the cap and gently stick together.

Bake in the oven until the caps are just turning golden brown - about 10-15 minutes.

Allow them to cool on the tray for five minutes then move onto a cooling rack. The biscuits will get crispier as they cool.

Make the icing for the dots: Sieve the icing sugar into the egg white and beat together with a spoon. Add a few drops of lemon. You should end up with a slightly runny icing.

Once the biscuits have cooled, dip the end of a cocktail stick into the icing and make small white dots on top of the caps.

Owl Ginger Cookies

Ingredients:

  • 250g Butter

  • 500g Plain flour

  • 200g Light Muscovado sugar

  • 2tsp Bicarbonate of Soda

  • 8tbsp Ground Ginger

  • Handful of Almonds

  • 4tsp Cocoa Powder

  • Handful of Dark Chocolate chips

  • 8tbsp Golden Syrup

To make these owl cookies you’ll need to mix up two different batches of cookie dough. One batch will have cocoa powder sifted into the flour to make it darker for the owl bodies, and the other will be plain without cocoa – this is for the centre of the faces.

Pre-heat the oven to 160˚/ gas mark 3 and line a baking tray with baking paper.

First make the lighter colour dough:

In a saucepan gently melt together 125g of butter, 4 tbsp of golden syrup and 100g of light muscovado sugar. Stir well until the sugar has dissolved.

In a bowl sift together 250g of plain flour, 4 tsp of ground ginger and 1 tsp of bicarbonate of soda. Pour the melted ingredients into the bowl of dry ingredients and mix until a soft dough is formed.

To make the darker dough repeat this but this time sift the three teaspoons of cocoa powder in with dry ingredients. Wrap up each ball of dough in cling film or baking paper and chill them in the fridge for 10 - 15 minutes.

Roll out the darker dough onto a lightly flowered surface to about 0.5cm thickness. Cut out circles using the circular cookie cutter. Using a spatula, carefully lift each circle onto your baking tray use. Use the heart cutter to cut out a heart shape slightly above the centre of each circle. You might need to use a small knife to gently lift out the hearts. Keep the heart shapes to one side as they can be baked alongside your owls.

Now roll out the lighter colour dough to the same thickness and cut out the same heart shapes. Fill the gaps in the Owl bodies with these lighter colour heart shapes. Use any left-over dough to make more hearts - so there’s no wastage 

Using the edge of your round cookie cutter make the indents of the wings on each side be careful not to cut right through.

Lightly press the end of a fork into the base of each circle to make the claws as pictured below.

Add chocolate chips for eyes and an almond for the beak, you could use sunflower seeds instead if you don't want to use nuts.

Bake in the oven until just turning golden brown - about 12-15 minutes.

Allow them to cool on the tray for five minutes then move onto a cooling rack the cookies will get crispier as they cool. Enjoy with a cup of cocoa and a cosy fire!

Rhubarb and Vanilla Cheesecake

I find the colour of forced rhubarb to be such a welcome sight at this time of the year. Here's my recipe for Rhubarb and Vanilla Cheesecake - it feels very nostalgic for me as it brings back delicious childhood memories of rhubarb and custard sweets. This cheesecake has a shortbread base, rather than one with digestive biscuits, which I find lends itself well to the delicate flavours of the rhubarb and vanilla.

Ingredients

For the shortbread base:

150g plain flour

50g caster sugar

100g slightly salted butter


For the rhubarb:

400g fresh rhubarb (chopped)

50g granulated sugar


For the filling:

800g cream cheese

125g caster sugar

3 large eggs

2 large egg yolks

70ml double cream

1 vanilla pod or 2 teaspoons of vanilla extract


Method:

Heat the oven to 160 degrees C/ 320 degrees F

Combine the base ingredients together in a mixing bowl by rubbing the butter into the flour and sugar with your hands, as if you were making crumble topping. Once the mixture resembles damp sand, press it into a 9 inch springform cake tin.

Chop the rhubarb into smallish chunks and toss with 50g of granulated sugar. Spread the rhubarb out over the bottom of an oven proof dish.

Place both in the oven and bake the rhubarb for 10 minutes, and the shortbread base for 20 minutes until it's turning slightly golden around the edges. Strain any juice from the rhubarb and, if you like, reserve for later as it makes a nice syrup. Allow the shortbread base and rhubarb both to cool completely.

Beat the cream cheese until it's smooth and then beat in the sugar, then add the eggs and yolks one by one. Be careful not to over beat so you don't end up with too much air in your mix. Score down the length of the vanilla pod and scrape out the little black seeds. Add them to the mixture. Finally, gently stir in the cream until evenly combined.

When cooled, spread the rhubarb over the biscuit base, then pour the filling over. The rhubarb will probably float to the top - make sure it's fairly evenly distributed. Place half of the leftover vanilla pod on top of the mix for an extra vanilla infusion.

Bake for 50 minutes - 1 hour, depending on your oven, until there is a tiny bit of wobble left on the cheesecake and some golden brown edges. If you over cook, it will start to crack, although I quite like that home-baked look, and it is more likely to happen anyway with the rhubarb in the mixture.

Allow to cool gradually in the oven with the door open (and oven switched off) for 20 minutes and then cool completely before refrigerating. Leave in the fridge for at least an hour or preferably overnight before unmoulding. Use a round edged knife or metal spatula to loosen the edge before releasing the springform. It's safer to leave the cheesecake on the cake base rather than trying to remove it and meeting disaster....

If you can manage to wait until the following day the cheesecake will be at it's best. The wait can be a bit agonising but it's worth it - breakfast has never been better!


Spiced Apple, Cranberry and Almond Christmas Cake

Here's the Craftpod Christmas cake recipe. I make it every year and I find it’s a good alternative to dense, richly fruited Christmas cake.
It's pretty quick to make, it's light, buttery and moist, and has all the traditional taste of the festive season in it! If you’re making it for children, you might prefer to use less brandy. Soak the cranberries in apple juice instead, or a combination of the two.


Ingredients

150g Butter (or margarine) at room temperature

175g Soft brown sugar

4 Large free-range eggs

125g Dried cranberries - soaked in 100ml of Brandy or Cointreau, overnight if possible (or for at least 2 hours)

2 Large dessert apples, chopped into small pieces

150g Ground almonds

100g White self-raising flour

1 teaspoon Baking powder

3 teaspoons Ginger powder

3 teaspoons Cinnamon powder

3 teaspoons Mixed spice powder

Grated zest of an orange

Marzipan (optional)

Icing sugar to dust

Method

Soak the cranberries in brandy overnight if you can.

Preheat the oven to 160 degrees C/gas mark 3. Line and grease a 24cm round cake tin.

In a mixing bowl, cream together the butter and sugar until light and fluffy. Add the eggs one at a time and beat together. Add the cranberries, into the bowl along with the chopped apple and stir in. Add the zest of the orange.

Sieve together the remaining (dry) ingredients and fold them well into the wet ingredients in the bowl.

Pour into the lined cake tin.

Roll up little balls of marzipan (depending on your preference for marzipan) and sink them into the cake. Then place a few extra pieces of marzipan onto the top of the cake. Bake at 160 degrees C/gas mark 3 for 35 minutes, then reduce the heat to 140 degrees C/gas mark 1 and bake for a further 15-20 minutes. The top should be golden and a bit springy when lightly pressed. Use a knife inserted into the centre of the cake to check it is cooked right through - it should come out without any wet mixture on it.

Leave the cake in the tin to cool for 15 minutes then place on a rack until cool (if you can bear the warm spicy smell - it’s also delicious eaten warm).

Once the cake has cooled completely, place on a plate and dust with icing sugar through a sieve for a snowy effect. Add your favourite Christmas cake decorations for a lovely festive scene!

Spiced Apple, Cranberry and Almond Christmas Cake